Category: Products

  • Plantar Fascia

    Plantar Fascia

    [vc_row css=”.vc_custom_1517939115140{padding-right: 20px !important;padding-left: 20px !important;background-color: #fbfbfb !important;}”][vc_column][vc_column_text]Published on March 31, 2020

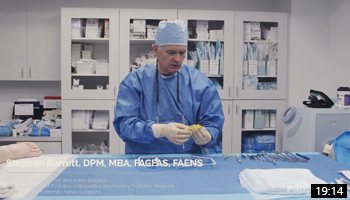
    Dr. Brian Allen shows us his technique of using cryoanalgesia to treat pain of the plantar fascia on a cadaveric foot. He explains the initial incision, probe placement, and freezing times. Dr. Allen also explains why cyroanalgesia is a less invasive and much safer than surgery.

    [/vc_column_text][/vc_column][/vc_row][vc_row][vc_column][vc_column_text css=”.vc_custom_1488298613118{margin-top: -20px !important;}”]


    [/vc_column_text][/vc_column][/vc_row]

  • Lumbar Cryoablation

    Lumbar Cryoablation

    [vc_row css=”.vc_custom_1517939115140{padding-right: 20px !important;padding-left: 20px !important;background-color: #fbfbfb !important;}”][vc_column][vc_column_text]Published on June 21, 2019

    Dr. Orlando Florete demonstrates how to properly perform cryoablation of the medial branch for lumbar facet pain using a cadaver. He shows the correct probe placement using fluoroscopy, explains the importance of sensory and motor stimulation to assure accurate and safe freeze, and details the freezing and defrost cycles.

    [/vc_column_text][/vc_column][/vc_row][vc_row][vc_column][vc_column_text css=”.vc_custom_1488298613118{margin-top: -20px !important;}”]


    [/vc_column_text][/vc_column][/vc_row]

  • Intro to Cryoablation

    Intro to Cryoablation

    [vc_row css=”.vc_custom_1517939115140{padding-right: 20px !important;padding-left: 20px !important;background-color: #fbfbfb !important;}”][vc_column][vc_column_text]Published on June 19, 2019

    Dr. Orlando Florete introduces the Pain Blocker for cryoablation in a cadaver lab before he demonstrates the procedure. He reviews the many neuropathies that respond well to this technique, including phantom limb pain. He explains how cryoablation is safer than heat lesioning by contrasting the neuron biology and axonal damage for both ablative procedures.

    [/vc_column_text][/vc_column][/vc_row][vc_row][vc_column][vc_column_text css=”.vc_custom_1488298613118{margin-top: -20px !important;}”]


    [/vc_column_text][/vc_column][/vc_row]

  • Bioness Stimrouter: Common Peroneal Nerve Procedure

    Bioness Stimrouter: Common Peroneal Nerve Procedure

    [vc_row css=”.vc_custom_1517939115140{padding-right: 20px !important;padding-left: 20px !important;background-color: #fbfbfb !important;}”][vc_column][vc_column_text]Published on April 19, 2019

    Dr. Stephen Barrett discusses the instruments in the Bioness StimRouter kit before demonstrating how to implant the device adjacent to the common peroneal nerve. He first locates the nerve with palpation and ultrasound, and with blunt dissection, he uses tools provided in the kit to advance the lead to cover the nerve. He then sutures the opening and shows the placement of the battery patch.Target Pain at its source. Learn more about the Bioness StimRouter at  http://stimrouter.com/

    [/vc_column_text][/vc_column][/vc_row][vc_row][vc_column][vc_column_text css=”.vc_custom_1488298613118{margin-top: -20px !important;}”]


    [/vc_column_text][/vc_column][/vc_row]

  • Bioness Stimrouter: Tibial Nerve Procedure

    Bioness Stimrouter: Tibial Nerve Procedure

    [vc_row css=”.vc_custom_1517939115140{padding-right: 20px !important;padding-left: 20px !important;background-color: #fbfbfb !important;}”][vc_column][vc_column_text]Published on April 2, 2019

    Dr. Stephen Barrett demonstrates two different approaches for lead placement of the Bioness StimRouter for tibial nerve stimulation. He shows how to locate the tibial nerve using ultrasound and simple palpation. He explains the importance for an optimal distance from the receiver to the transducer and the location for the battery patch after lead placement.

    Target Pain at its source. Learn more about the Bioness StimRouter at  http://stimrouter.com/

    [/vc_column_text][/vc_column][/vc_row][vc_row][vc_column][vc_column_text css=”.vc_custom_1488298613118{margin-top: -20px !important;}”]


    [/vc_column_text][/vc_column][/vc_row]

  • Bioness Stimrouter

    Bioness Stimrouter

    [vc_row css=”.vc_custom_1517939115140{padding-right: 20px !important;padding-left: 20px !important;background-color: #fbfbfb !important;}”][vc_column][vc_column_text]Published on January 2, 2017

    Dr. Youssef Josephson performs a live Bioness Stimrouter PNS implant to treat neuropathy of the lateral femoral cutaneous nerve caused by a previous total hip replacement. Using this system he effectively stimulates the peripheral nerve without having to implant the IPG. He uses anatomical landmarks along with ultrasound to safely and quickly implant the electrode to the intended target. He finishes the procedure by tunneling the small receiver for communication with the External Pulse Transmitter (EPT).Target Pain at its source. Learn more about the Bioness StimRouter at  http://stimrouter.com/

    [/vc_column_text][/vc_column][/vc_row]

  • Hypertonic Saline

    Hypertonic Saline

    [vc_row css=”.vc_custom_1517939115140{padding-right: 20px !important;padding-left: 20px !important;background-color: #fbfbfb !important;}”][vc_column][vc_column_text]Published on May 26, 2017

    Dr. Gabor Racz talks about his involvement in discovering the benefits introducing hypertonic saline in the epidural space after a lysis of adhesion procedure. He and his colleagues found this to reduce pain as the local anesthetic’s effect began to wane. The efficacy and safety of hypertonic saline has been well documented, as he explains, as it is not a neurolyitc. The hyperosmotic property simply disrupts the action potential (conduction) of the nerve, while neurolyitcs will damage the nerve.

    [/vc_column_text][/vc_column][/vc_row]

  • RX-2 vs Standard

    RX-2 vs Standard

    [vc_row css=”.vc_custom_1517939115140{padding-right: 20px !important;padding-left: 20px !important;background-color: #fbfbfb !important;}”][vc_column][vc_column_text]Published on February 15, 2017

    Dr. Racz compares the use of a standard introducer needle to the RX-2 Coude needle for inserting spinal cord simulators. The standard needle is similar to that of a Tuohy and has a curve in the tip. This exposed cutting edge can lead to accidental advancement of the SCS into the subdural space. This danger is averted by using the atraumatic stylet with the RX-2 Coude.

    [/vc_column_text][/vc_column][/vc_row]

  • RX-2 Conclusion

    RX-2 Conclusion

    [vc_row css=”.vc_custom_1517939115140{padding-right: 20px !important;padding-left: 20px !important;background-color: #fbfbfb !important;}”][vc_column][vc_column_text]Published on February 15, 2017

    Dr. Racz reviews a few key points to conclude his discussion on the use and advantage of the RX-2 Coude needle, not only for efficacy but also patient safety.

    [/vc_column_text][/vc_column][/vc_row]

  • RX-2 Patient Positioning

    RX-2 Patient Positioning

    [vc_row css=”.vc_custom_1517939115140{padding-right: 20px !important;padding-left: 20px !important;background-color: #fbfbfb !important;}”][vc_column][vc_column_text]Published on January 6, 2017

    Dr. Racz offers simple yet important “tips” when positioning a patient in the prone position for optimal fluoroscopic viewing of the spine. With these two basic principles, one can clear the shoulders from the lateral view and open the interlaminar spaces for better accessibility.

    [/vc_column_text][/vc_column][/vc_row]